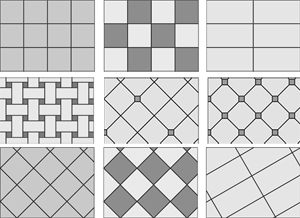
Whether you are choosing a fantastic ceramic tile or standing by classic marble for the flooring, the tile type will be only part of the overall effect. Tile arrangement also matters and believe it or not there are many ways to arrange tiles on the floor and create interesting layouts. Of course most installers suggest to their customers straight tile arrangement or diagonal. The first option is quicker and easier to install but rather ordinary. So if you like to think outside the box, then take a look at the following tile layout options.

- Arrange tiles in vertical & horizontal rows
This arrangement is probably the most popular layout. To install tiles this way, either square or rectangular, you simply place them one next to the other, so that the grout lines form a grid of horizontal and vertical rows. An interesting option is to choose tiles of two different colors to form chessboard flooring. The pattern is also called stacked pattern. Due to its simplicity, the square layout is a good choice when the space is noisy or when the goal is to create a modern look with clean shapes.

- Arrange tiles on an angle (usually 45o)
Some interior designers purport that tiles placed on an angle instead of squared off with the wall add more interest to a floor and makes spaces appear larger and the floor expansive. It is true that straight tile-layout in a small room screams out how small the room is. Think that you can actually count the measurements of the room by counting the tiles. Moreover, diagonal layout seems to be a good choice when walls are not parallel. If you plan to lay tiles diagonally, purchase about 10 to 15 percent more tile that your estimations, since some will be wasted to cut partial tiles.
Two colors of square tiles alternate to create the diagonal checkerboard.

- Brick pattern tiles
It is also called running bond or offset pattern. In a brick layout, each row of tiles is offset by half a tile width. The result is long horizontal rows. Many designers use brick layout as a trick to widen a narrow space.

- Diagonal layout with dots
A stylish and rich layout but it is difficult-to-install. So you have to find an experienced installer. To create this pattern use large tiles notched with smaller tiles at regular intervals. The smaller tiles work as accent dots so it is preferable to choose contrasting colors.

- Herringbone
This layout is achieved by arranging tiles at right angles into zigzag shapes. It is only possible with rectangular tiles. To make the effect more dramatic opt for long, thin tiles. The final look will be sophisticated, eye-catching but rather noisy.

- Pinwheel / Windmill tile layout
Pinwheel is also known as Hopscotch. To achieve the pinwheel layout you need a small square tile surrounded by four larger ones. To arrange tiles in windmill pattern you have a square tile in the center surrounded by four rectangular ones.
The basic difficulty of both layouts is to calculate the grout width and to find tiles of appropriate size. For a more eye-catching effect pick tiles of contrasting colors.

- Basket-weave
The pattern is made with squares and rectangles to create a woven effect. The difficulty is to find tiles of appropriate size.
- Versailles or Opus Romano
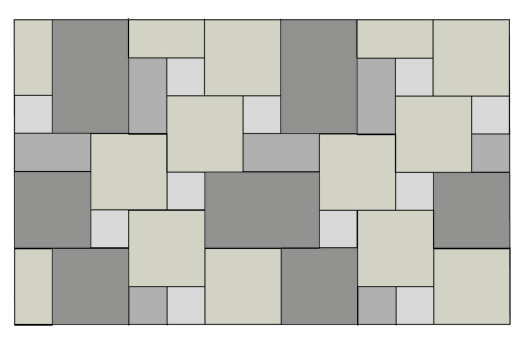
There are even more complex tile layout, made with three or four different tile sizes such as Versailles or Opus Romano.

| < Prev | Next > |
|---|


